webpack 浅尝辄止系列——第一个webpack项目搭建

1 项目初始化

官网文档配置文档说明

1
2
3
4
5
6
# 创建目录进入目录
mkdir webpack-demo && cd webpack-demo
# 项目初始化
npx webpack-cli init
# 接下来根据提示选择自己需要的插件包
...

选择TypeScript而不是es6理由——官网说明:TypeScript 是 JavaScript 的超集,为其增加了类型系统,可以编译为普通 JavaScript 代码。

选择PostCSS理由——Github文档说明,功能很强大

初始化完成,下面是我选择的依赖包

1
2
3
4
5
6
7
8
9
10
11
12
13
14
15
+ sass-loader@12.4.0
+ html-webpack-plugin@5.5.0
+ webpack-dev-server@4.7.3
+ css-loader@6.5.1
+ sass@1.48.0
+ webpack-cli@4.9.1
+ style-loader@3.3.1
+ ts-loader@9.2.6
+ typescript@4.5.4
+ postcss@8.4.5
+ prettier@2.5.1
+ autoprefixer@10.4.2
+ webpack@5.66.0
+ postcss-loader@6.2.1
added 336 packages from 263 contributors, removed 281 packages, updated 3 packages and moved 19 packages in 44.959s

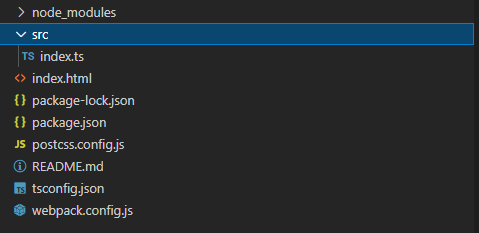
初始化后项目结构图

![1642305075375](webpack 浅尝辄止系列——第一个webpack项目搭建/1642305075375.png)

初始化后package.js

1
2
3
4
5
6
7
8
9
10
11
12
13
14
15
16
17
18
19
20
21
22
23
24
25
26
27
28
{
"version": "1.0.0",
"description": "My webpack project",
"name": "my-webpack-project",
"scripts": {
"build": "webpack --mode=production --node-env=production",
"build:dev": "webpack --mode=development",
"build:prod": "webpack --mode=production --node-env=production",
"watch": "webpack --watch",
"serve": "webpack serve"
},
"devDependencies": {
"autoprefixer": "^10.4.2",
"css-loader": "^6.5.1",
"html-webpack-plugin": "^5.5.0",
"postcss": "^8.4.5",
"postcss-loader": "^6.2.1",
"prettier": "^2.5.1",
"sass": "^1.48.0",
"sass-loader": "^12.4.0",
"style-loader": "^3.3.1",
"ts-loader": "^9.2.6",
"typescript": "^4.5.4",
"webpack": "^5.66.0",
"webpack-cli": "^4.9.1",
"webpack-dev-server": "^4.7.3"
}
}

初始化自动得到配置文件
官方配置文档

1
2
3
4
5
6
7
8
9
10
11
12
13
14
15
16
17
18
19
20
21
22
23
24
25
26
27
28
29
30
31
32
33
34
35
36
37
38
39
40
41
42
43
44
45
46
47
48
49
50
51
52
53
54
55
56
57
58
59
60
61
62
63
64
65
66
67
68
69
70

// Generated using webpack-cli https://github.com/webpack/webpack-cli
//path模块 路径处理工具
const path = require("path");
//简化了HTML创建 该插件将为你生成一个 HTML5 文件, 在 body 中使用 script 标签引入所有 webpack 生成的 bundle。
const HtmlWebpackPlugin = require("html-webpack-plugin");

//process.env.NODE_ENV 对应上面--node-env=production
const isProduction = process.env.NODE_ENV == "production";

const stylesHandler = "style-loader";

const config = {
entry: "./src/index.ts",//入口文件
output: {//编译后输出目录 及通常npm run build后
path: path.resolve(__dirname, "dist"),
},
devServer: {//web服务配置
open: true,
host: "localhost",
},
plugins: [//插件配置
new HtmlWebpackPlugin({
template: "index.html",
}),

// Add your plugins here
// Learn more about plugins from https://webpack.js.org/configuration/plugins/
],
module: {// 模块配置相关
rules: [// 模块规则(配置 loader、解析器等选项)
{
test: /\.(ts|tsx)$/i,
loader: "ts-loader",
exclude: ["/node_modules/"],
},
{
test: /\.s[ac]ss$/i,
use: [stylesHandler, "css-loader", "postcss-loader", "sass-loader"],
},
{
test: /\.css$/i,
use: [stylesHandler, "css-loader", "postcss-loader"],
},
{
test: /\.(eot|svg|ttf|woff|woff2|png|jpg|gif)$/i,
type: "asset",
},

// Add your rules for custom modules here
// Learn more about loaders from https://webpack.js.org/loaders/
],
},
resolve: {
extensions: ['.ts', '.vue', '.json', ".js", '.png', ".sass",".css"],
alias: {
'@': resolve('src')
}
},
};

module.exports = () => {
if (isProduction) {
config.mode = "production";
} else {
config.mode = "development";
}
return config;
};

2 安装js工具库

Lodash 是一个一致性、模块化、高性能的 JavaScript 实用工具库 查看各个构件版本的区别并选择一个适合你的版本。功能强大,兼容性强。
官网说明

1
npm install --save lodash

3 对配置文件进行开发配置

webpack.config.js

output 配置
1
2
3
4
5
output: {
filename: '[name].bundle.js',//name对应多入口
path: path.resolve(__dirname, 'dist'),
clean: true,//每次构建时清空之前的dist输出目录
}
设置title
1
2
3
4
5
plugins: [
new HtmlWebpackPlugin({
title: '网页显示title',//filename title不能同时配置
}),
]
开发环境
1
2
3
4
const config = {
mode: 'development',
...
}
source map 定位错误
1
2
3
4
const config = {
devtool: 'inline-source-map',
...
}
配置引入文件@
1
2
3
4
5
6
resolve: {
extensions: ['.ts', '.vue', '.json', ".js", '.png', ".sass",".css"],
alias: {
'@': path.join(__dirname, '.', 'src')//'.'根据当前配置webpack.config.js而定
}
}
将 CSS 提取到单独的文件中,为每个包含 CSS 的 JS 文件创建一个 CSS 文件
1
2
# 安装后的版本总是配置不成功,这里我是把它的版本号改为2.4.5
npm install --save-dev mini-css-extract-plugin

配置

1
2
3
4
5
6
7
8
9
10
11
12
13
const MiniCssExtractPlugin = require("mini-css-extract-plugin");

module.exports = {
plugins: [new MiniCssExtractPlugin()],
module: {
rules: [
{
test: /\.css$/,
use: [MiniCssExtractPlugin.loader, "css-loader"],
},
],
},
}
优化和压缩 CSS。

[官网文档](https://webpack.docschina.org/plugins/css-minimizer-webpack-plugin/#root

1
npm install css-minimizer-webpack-plugin --save-dev
1
2
3
4
5
6
7
8
9
10
11
12
13
14
15
16
17
18
19
20
21
const MiniCssExtractPlugin = require("mini-css-extract-plugin");
const CssMinimizerPlugin = require("css-minimizer-webpack-plugin");

module.exports = {
module: {
rules: [
{
test: /.s?css$/,
use: [MiniCssExtractPlugin.loader, "css-loader", "sass-loader"],
},
],
},
optimization: {
minimizer: [
// 在 webpack@5 中,你可以使用 `...` 语法来扩展现有的 minimizer(即 `terser-webpack-plugin`),将下一行取消注释
// `...`,
new CssMinimizerPlugin(),
],
},
plugins: [new MiniCssExtractPlugin()],
};
生产环境下默认使用 TerserPlugin ,并且也是代码压缩方面比较好的选择

安装

1
npm install --save-dev closure-webpack-plugin google-closure-compiler

配置

1
2
3
4
5
6
7
8
9
10
11
12
13
14
15
16
17
const ClosurePlugin = require('closure-webpack-plugin');

module.exports = {
optimization: {
minimizer: [
new ClosurePlugin({mode: 'STANDARD'}, {
// compiler flags here
//
// for debugging help, try these:
//
// formatting: 'PRETTY_PRINT'
// debug: true,
// renaming: false
})
]
}
};
4 安装vue开发需要包

vue 相关 qs请求转化 加密解密 请求相关

1
npm install vue vuex vue-router qs crypto-js axios

开发环境依赖包

1
npm install  vue-loader vue-template-compiler --save-dev
5 配置vue环境

(1) webpack.config.js

1
2
3
4
5
6
7
8
9
10
11
12
13
14
15
16
17
18
19
20
21
22
23
24
25
26
27
28
29
30
31
32
33
// Generated using webpack-cli https://github.com/webpack/webpack-cli
const HtmlWebpackPlugin = require("html-webpack-plugin");
const { VueLoaderPlugin } = require('vue-loader');
...
const config = {
...
resolve: {//加入.vue解析
extensions: ['.ts', '.vue', '.json', ".js", '.png', ".sass", ".css"],
alias: {
'@': path.join(__dirname, '.', 'src')
}
},
plugins: [
...
new HtmlWebpackPlugin({
filename: "index.html",
template: "index.html" //指定模板文件加入 <div id="app"></div>
}),
new VueLoaderPlugin(),//vue加载插件
],
module: {
...
rules: [
{//vue规则
exclude: /node_modules/,
test: /\.vue$/,
loader: 'vue-loader',
},
],
},

};

(2) index.html

1
2
3
4
5
6
7
8
9
10
11
12
13
<!DOCTYPE html>
<html>
<head>
<meta charset="utf-8" />
<title>Webpack App</title>
</head>
<body>
<h1>Hello world!</h1>
<h2>Tip: Check your console</h2>
<div id="app"></div>
</body>

</html>

(3) 将入口文件index.js内容修改,这里如果习惯之前的vue构建项目可以修改为main.js 把入口文件名称修改下就行

1
2
3
4
5
6
7
8
9
10
11
12
13
14
import Vue from 'vue'
import App from './App.vue'
Vue.directive('title', {
inserted: function (el, binding) {
document.title = el.dataset.title
}
})

Vue.config.productionTip = false

new Vue({
el: '#app',
render: h => h(App)
})

(4) App.vue

1
2
3
4
5
6
7
8
9
10
11
12
13
14
15
16
17
18
19
20
21
22
23
24
<template>
<div id="app">
<hello-world/>
</div>
</template>

<script>
import HelloWorld from '@/components/HelloWorld'
export default {
name: 'App',
components:{
HelloWorld
}
}
</script>

<style lang='scss'>
#app {
height: 100%;
> div {
height: 100%;
}
}
</style>

(5) HelloWorld.vue

1
2
3
4
5
6
7
8
9
10
11
12
<template>
<p>helloworld</p>
</template>
<script lang="ts">

export default {
name:"HelloWorld"
}
</script>
<style scoped>

</style>
6 快速开发
1
2
3
4
5
6
7
npx webpack-cli init
npm install --save lodash vue vuex vue-router qs crypto-js axios
npm install --save-dev mini-css-extract-plugin vue-loader vue-template-compiler css-minimizer-webpack-plugin
#svg处理插件
npm install svg-sprite-loader -D
# 图片处理
npm install url-loader image-webpack-loader --save-dev

安装依赖
读取svg信息,去除svg中的无用标签,精简结构

1
npm install svgo svgo-loader --save-dev

SVG Sprite插件

1
npm install svg-sprite-loader --save-dev
7 开发问题

vue webpack之vue-router 使用history模式报错Cannot GET /xxx

1
2
3
4
5
在webpack.config.js中的devServer内添加属性historyApiFallback
historyApiFallback: {
index: '/index.html'//该路径为打包后的首页路径及dist目录下的index.html页面
},

8 按需加载

ts-loader label-loader

1
https://juejin.cn/post/6844904052094926855

····


webpack 浅尝辄止系列——第一个webpack项目搭建
https://leellun.github.io/2019/01/26/前端/webpack 浅尝辄止系列——第一个webpack项目搭建/
作者
leellun
发布于
2019年1月26日
许可协议